TheMarceloR

::Troubleshooting, Coding and Comic Books
Docker Docker Docker Dockerize Everything
19 Feb 2016 - Marcelo Costa
What is Docker? It is magic powered by unicorn blood.
In this post you will learn:
- What is Docker?
- How to install and run it
- More about Docker images
- How to return to the host-machine without killing my container?
- How to use your own internal Docker registry to store images
- How to push your image to Artifactory
- The Dockerfile: Best practices & versioning
- How to copy a Docker image to some other Docker host
- Docker networking
- How to monitor containers
So, let’s get started.
What is Docker?
It is magic powered by unicorn blood.
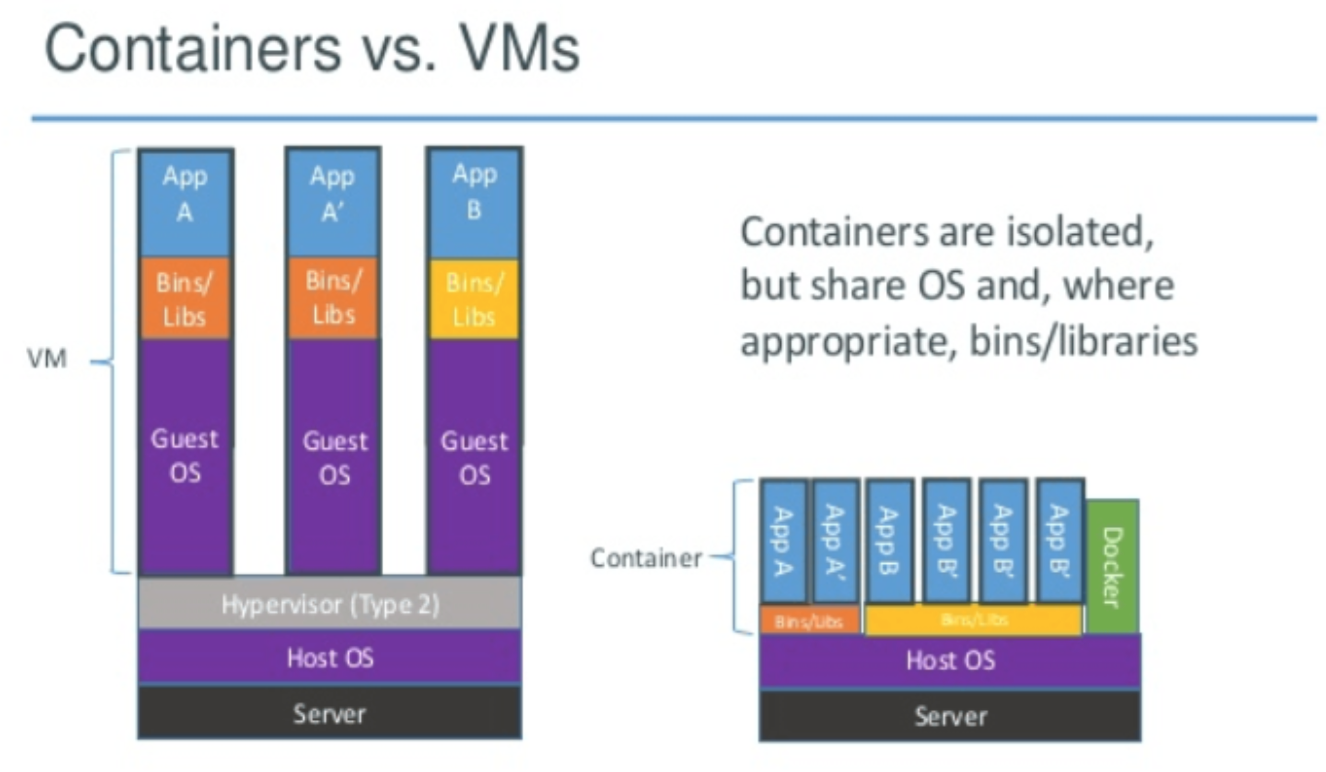
Think of it as a Virtual Machine but, instead of having the Operating System + Hypervisor layers below the application you want to run, it just shares a “sub-context” of the Linux Kernel and allows you to run other Linux’es within the same Linux — Completely separated virtual environments with their own libraries + OS tools + applications + exposed ports, etc. And why is it so cool? You might ask, once you assemble your container with everything you want, you can take a snapshot of that (which is known as a Docker IMAGE) and spin new containers. You can spin multiple instances of a given image, think of it in terms of OOP, where you can create instances out of a class, so you are doing basically the same thing by creating containers out of a Docker image.

Beyond the virtualized, isolated characteristics, it is really time-efficient. There’s no Guest OS to boot here so you can actually start your container in a split second with the software you want, that, according to the actual command you set for it, it will start that process in the foreground for whatever purpose. If it is a web or an application server, it will just come up straight away, ready to service requests.
How to install and run it
The installation is very straight forward, you can find the details in the link below: https://docs.docker.com/engine/installation/
Don’t forget to start your Docker daemon:
/bin/systemctl start docker.service
If you are in a Mac OS environment, find the little Docker icon on the top-right corner of your screen:

Then you can start a container and play in a completely isolated / virtualized environment:
# docker run -it –name mycontainer centos /bin/sh
Quick review of the docker run syntax:
| Parameter | Description |
|---|---|
| -d (detached) | Runs in detached mode (not interactive) |
| –name | Name of the container |
| -h (hostname) | Hostname within the Docker network |
| –link | Allow communication between containers |
| -p (port) | Exposed port ( |
| -v (volume) | Mapped volume/disk path ( |
| < image > | Name of the docker image |
| -w (work dir.) | Initial directory for the container command |
| -t (tty/term.) | Assign pseudo-tty for the container |
| -i (input) | Set STDIN of the container (interactive) |
Here is a slightly more complex example (running a local project just to illustrate):
# docker run -d –name mykanban -h mykanbanapp –link mydbcontainer -p 8080:8080 -w /opt/mykanban -v /home/marcelo/Projects/MyOnlineKanban/mykanban:/opt/mykanban java:8 /usr/bin/jjs – cp lib/mongo-2.10.1.jar httpsrv.js
More about Docker images
So, let’s say I want to create my image with a “netcat” pre-installed. I would need to run:
# docker run -it –name my-docker-name centos /bin/sh
If that is the first time you are trying to spin a container out of the “centos” image, the Docker daemon will go to Docker Hub and get that image for you:
Unable to find image ‘centos:latest’ locally
latest: Pulling from library/centos
a3ed95caeb02: Pull complete
Digest: sha256:1a62cd7c773dd5c6cf08e2e28596f6fcc99bd97e38c9b324163e0da90ed27562
Status: Downloaded newer image for centos:latest
Then you can install what you need:
# yum install nc

Installed: nc.x86_64 2:6.40-7.el7 Complete!
How to return to the host-machine without killing my container?
If you entered a container with docker exec you can just type exit to leave the container. However, if you started a container with docker run then you should use the following shortcut:
ctrl+p ctrl+q
And now you can see that your container is still running (because you started it with a perpetual shell terminal process: /bin/sh):
# docker ps -n 1

CONTAINER ID PORTS IMAGE COMMAND NAMES

f03d4ba0a56f CREATED 22 minutes ago STATUS Up 22 minutes        centos "/bin/sh" nc-image
So you can now “commit” that container and create your first DOCKER IMAGE (i.e., basically taking a snapshot of the container and turning that state into an image):

# docker commit f03d4ba0a56f nc-server
sha256:ff5450d8c2733cd1edc68e9eda344b2a4f53e297a449e713bfb3cd72a9ddfa9e
Then it becomes part of the images available in this Docker Host server:
# docker images

REPOSITORY    IMAGE      ID             CREATED          SIZE
nc-server     centos     ff5450d8c273   6 seconds ago    278.8 MB
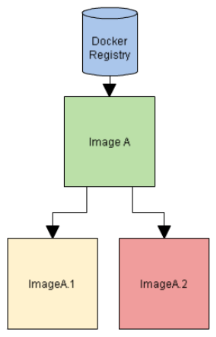
We can create new images out of base images for different purposes, we can even extend them for specific use cases.

How to use your own internal Docker registry to store images
Here is how you connect to it:
Go to artifactory, click on your user name on the top right.
provide the password once more and click on the gear icon to generate an API key (i.e., the artifactory encrypted password).
And, finally, login:
# docker login artifactory.yourcompanydomain.com:6556

Username: your.name@yourcompanydomain.com
Password:
Login Succeeded
How to push your image to artifactory
First we need to tag it:
Here’s the syntax => docker tag [OPTIONS] IMAGE[:TAG] [REGISTRYHOST/] [USERNAME/]NAME[:TAG]
# docker tag my-busybox artifactory.yourcompanydomain.com:6556/docker-images/repositories/dev/my-busybox:test- tag

# docker push artifactory.yourcompanydomain.com:6556/docker-images/repositories/dev/my-busybox:test-tag
The push refers to a repository [artifactory.yourcompanydomain.com:6556/docker-images/repositories/dev/my-busybox:test-tag] 06cc5a7ff579: Pushed
test-tag: digest: sha256:82b9618df57b5fc2ebed3d79c3d26e3ccb51e3f302348979b7534af555e2913a
size: 940
Checking results:
# docker images | grep test-tag
REPOSITORY TAG IMAGE ID SIZE

artifactory.yourcompanydomain.com:6556/docker-images/repositories/dev/my-busybox:test-tag  17 minutes ago 1.113 MB
Pushed and tagged.
The Dockerfile: Best practices & versioning
Committing your docker container into an image is a bad practice because the whole process is very manual and not very flexible. Imagine that you want to install an earlier version of “netcat”, then you will need to jump inside a container that was created out of the image you committed earlier and then uninstall & install another version of netcat. Or you need to create another container from scratch. It’s just too messy. Imagine a more granular change involving multiple points of configuration within the same container (e.g., service packs, JVM arguments, port configuration, OS-level tweaks, etc.), it’s a nightmare to manage all that by manually committing changes.
Therefore, do not commit containers !!! THAT WAS JUST FOR SHOW! — USE DOCKERFILES!!!
Following good automation practices: if you need to apply a number of custom steps to assemble your container, it is a bad idea to spin it and commit it. To solve that problem we use the “Dockerfile”.

-
Create a “Dockerfile” under your project folder: /home/user/Projects/my-nc-server
-
Introduce the instructions you need, e.g.:
FROM centos
MAINTAINER Marcelo Costa <marceloc@whatever.com>

RUN yum -y install nc
RUN yum -y install net-tools
- Create a new custom image with the following command (running within the “my-nc- server” directory):
# docker build .
You can also introduce the [name-of-the-image]:[tag] notation with the “–tag” parameter:
# docker build –tag my-nc-server:test-tag .
*More info: https://docs.docker.com/engine/userguide/eng-image/docker
How to copy a Docker image to some other Docker host
You can also copy images as packages with the Save/Export & Load commands.
What is the difference between Save and Export? Answer: Save persists an image whereas Export persists containers.
Here is how you do it:
# docker save my-busybox >my-busybox.tar
# scp my-busybox.tar user@somemachine:/home/user/

Uploading….

my-busybox.tar 100% 1299KB 1.3MB/s 00:00

# scp user@somemachine:/home/user/my-busybox.tar .

Downloading….
my-busybox.tar 100% 1299KB 1.3MB/s 00:00

# docker load < my-busybox.tar
1834950e52ce: Loading layer 1.311 MB/1.311 MB

# docker images | grep busy
my-busybox latest 5d8cbe820583 About an hour ago 1.113 MB
Docker networking
Docker offers 3 types of network configuration: bridge, host and none. You can define “none” if you want to waste a lot of time configuring everything yourself.
The “host” option sucks really bad — it replicates all the network interfaces of the Docker host into your container so there is no magic of isolated virtualization.
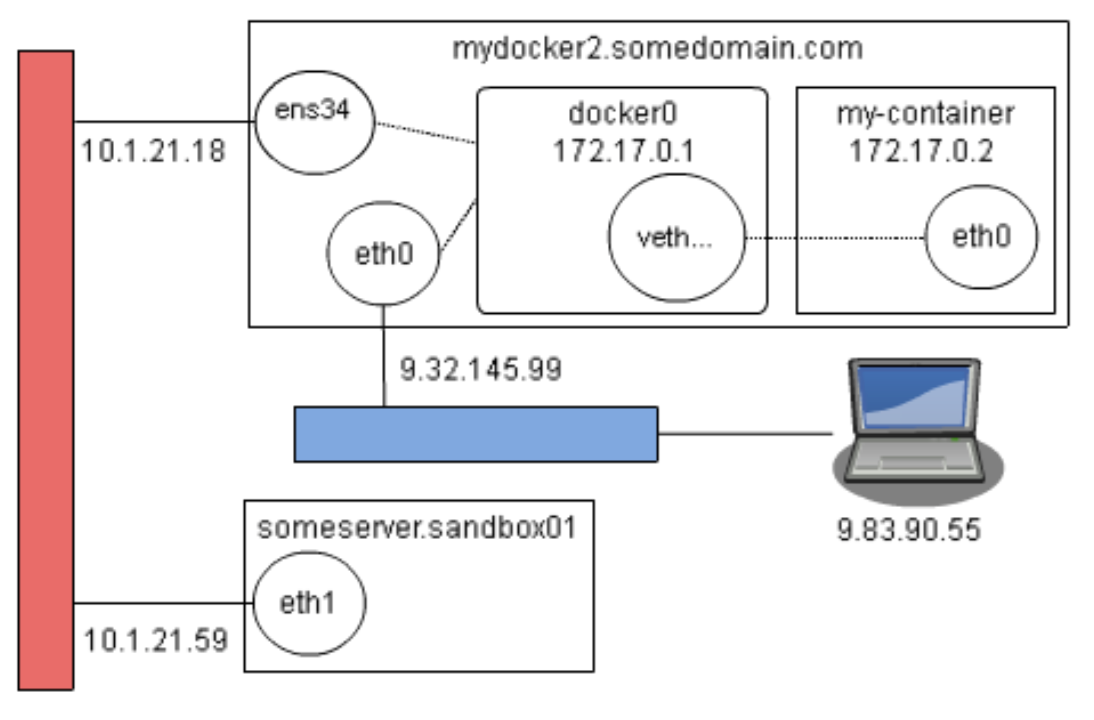
The default option “bridge” is applied when none of the others are specified. This option creates a “docker0” interface in your Linux and, for each container that you start, a Virtual Ethernet interface is created along with it (it is usually named as “veth
e.g., sandbox01 → dockerhost : ens34 :: docker0 :: vethXXX → container : eth0
An example of the how the network interfaces connect with each other:

Be aware that scripts under “/etc/sysconfig/network-scripts” that contain the name of that interface can potentially block this flow, depending on its instructions.
Yeah, a very specific caveat here… you guessed it right, I had faced an issue with that and got stuck for a few days on it 😦
How to monitor containers
Ideally, if you have a container orchestration system like Kubernetes, then you can consider sophisticated tools like Prometheus. If you just want to monitor containers from within the Docker host, here are some useful commands:
docker top
# docker top nc-server

UID PID PPID C STIME TTY TIME CMD

root 28524 28510 0 11:36 pts/1 00:00:00 nc -vv -l 8080
docker stats
# docker stats nc-server
CONTAINER CPU % MEM USAGE / LIMIT MEM % NET I/O BLOCK I/O PIDS

nc-server 0.00% 9.769MB/12.42GB 0.08% 48B/648B 9.409MB/0B 0
Keep in mind:
docker exec -it <container-name> /bin/bash
ctrl+p & ctrl+q (return to docker host)
docker logs -ft <container-name>
That’s it. Just some general Docker instructions that should bring you up to speed if you never play with it before, please provide suggestions to expand this article in the comments.