TheMarceloR
::Troubleshooting, Coding and Comic Books
Emacs tips
-
Emacs zone
Ok, here it goes…
Installation
sudo apt-get install emacs
BASICS
Add the following lines to your “~/.emacs.d/init.el” file:
(require 'package)
(add-to-list 'package-archives '("melpa" . "http://melpa.org/packages/") t)
*More about Emacs package management in this post from a Bulgarian dude. https://batsov.com/articles/2012/02/19/package-management-in-emacs-the-good-the-bad-and-the-ugly/
#Start Emac
emacs
or
emacs -nw
_*I prefer to use Emacs in its “no-window” mode.__
Find/Open files
C-x f = file
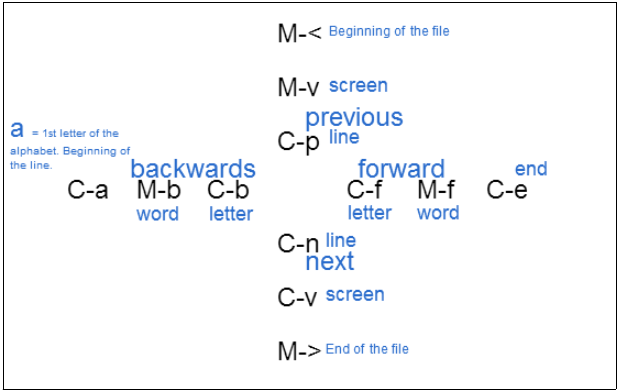
MOVEMENT
Exit Emacs
C-x C-c
Marking, Cutting, Copying & Pasting
C-space = Starts marking *(move around the document to select the fragment of content you want).
C-g = Cancel mark
C-w = Cut
M-w = Copy
C-y = Yank / Paste
Undo / Redo
C-x u = Undo
C-Shift _ = Redo
Save file
C-x s = Save
Moving between points of interest
Mark one or more sections of the document with C-space and C-g then use
C-u C-space = moves to the previously marked location
BUFFERS
C-x b = presents list of buffers at the bottom of the interface (aka: mini-buffer) *move to the next buffer with C-s (step) and to the previous buffer with C-r (return).
C-x C-b = presents list of buffers on the main screen with details *You can tag which buffers to delete with “d” and can undo that action with “u”
WINDOWS
C-x 3 = Splits the window horizontally
C-x 2 = Splits the window vertically
C-x o = Other. Moves to the other window
C-x 0 (zero) = Closes the active window.
HELP!
C-h k = Key. Press the key combination and Emacs will take you to the help page containing the instructions to it.
CUA Mode
To demonstrate the power of this feature, let us create an unordered list by writing some HTML code:
Write a list of names:
Fat Mike
Melvin
El Hefe
Smelly
Enter cua-mode by typing “M-x cua-mode”. This cua-mode interface allows you to select text through rectangle marks. To start selecting, officially you have to type “C-Enter” (aka: C-RET), however, it did not work in my Xubuntu’s terminal, if C-RET does not work for you, the key mapping for this function must be customized. Here’s how you do it:
While in cua-mode, type “M-x” to execute a command in the mini-buffer. Type “M-x” followed by “customize-variable”, press ENTER Type “cua-rectangle-mark-key”, press ENTER.
In this interface you can navigate to the editable text-field and set another key to replace “ENTER” (RET) in the shortcut that select text rectangularly t in cua-mode, you can set this new shortcut by reproducing the desired sequence and the character should be captured in the text-field. Once the new key is set you should navigate to the “Apply and save” link and press ENTER. (I have selected C-. to be the new shortcut for my rectangular selection).
Now that your cua-mode selection is working, select all 4 names in the list starting at the end of “Smelly” and marking the text all the way up to “Fat Mike”, i.e., the beginning of the first line. Now type “<li>”, you will see that it will move all 4 lines and replicate the typing in all of them:
<li>Fat Mike
<li>Melvin
<li>El Hefe
<li>Smelly
You can disable the rectangular selection by pressing the shortcut once more (e.g., C-. ). If you wish to add an attribute to all the “list item” tags (<li>) you can move the cursor within the tag and select all the rows once more within the same column. Start typing and you should get:
<li id=”punk”>Fat Mike
<li id=”punk”>Melvin
<li id=”punk”>El Hefe
<li id=”punk”>Smelly
If you want to introduce some sequence of numbers you can achieve that by pressing “M-n” (numerical sequence). Move the cursor to the end of the value of the “id” attribute and, with the rectangular selection within that column , add an underscore character (_) and press “M-n”. The mini-buffer presents the options to add the sequence (“start value”, “Increment”, etc.) just press ENTER to accept the default values and you should see the result:
<li id=”punk_0″>Fat Mike
<li id=”punk_1″>Melvin
<li id=”punk_2″>El Hefe
<li id=”punk_3″>Smelly
That concludes the cua-mode section.
Emacs as a Python IDE
Here’s how to install the “elpy” mod against Emacs to introduce some Python IDE features:
Type “M-x list-packages”, wait until it connects to the packages’ repository and press “C-s” to search for the package called “elpy” (you can browse back and forth between packages by pressing C-M-s and C-M-r, respectively. Again, consider the “step” and “return” words to remember these navigation options). Once you find the package, press ENTER and confirm the installation.
The next step is to initialize the Python IDE features by editing your “~/.emacs.d/init.el” file (and include some lines to fix some key binding issues):
;; Fixing a key binding bug in elpy for snippet expansion
(define-key global-map (kbd "C-c k") 'yas-expand)
;; Fixing another key binding bug in iedit mode
(define-key global-map (kbd "C-c o") 'iedit-mode)

(elpy-enable)
The “elpy” mod includes some cool features, such as:
- Syntax highlighting / colors
- Auto-complete
- Interpreter failures / Static Analysis
- Special shortcuts to increase productivity
- Common productivity shortcuts
M-; = Comment multiple lines of code. Select the same lines and use the same shortcut to uncomment the code.
C-c C-r r = Refactor. It presents refactoring options (e.g., extract a given snippet of code and move to a separate function).
C-c k = Expand Kode. It can auto-complete the common format of a given function, e.g., for, if, etc.
C-d = Documentation. Checks the correspondent excerpt from the help page related to a given function or Python instruction.
C-c C-e = Simultaneous Editing. This shortcut allows you to rename the name of a given variable or function by changing all the occurrences of that variable or function within the same script simultaneously. Use the same shortcut again to leave the edit mode.
C-h m = Manual. Presents an instructions manual with all the key bindings associated with the modes/mods that are being used in that given buffer.
Flyspell-mode
M-x flyspell-mode = This will enable a real-time spell checking mechanism, it’s one of the “Minor Modes” that are shipped OOTB with Emacs. Once you enable it, the words will turn red if they are misspelled. In order to check the suggestions press M-$ and the options should show up at the top of the screen.
Version Control: Emacs & GIT
M-x vc-diff = This command shows the difference between the local modified version of the file and the version that is currently committed into the HEAD.
C-x v u = versioning-undo. It discards the changes that were staged since the last commit.
C-x v ~ = Open a specific revision (just need the first characters as the input) in a separate buffer.
C-x v l = versioning-log. Open log showing all the revisions associated with the file currently opened in the buffer.
You can browse through the revisions and press “f” when the cursor is on a given revision ID to open it on a separate buffer. You can also see a diff report between the selected revision and the subsequent one by pressing “d”. C-x v i = insert. It adds a file to the staging area within the emacs interface.
To stage, commit, push and pull within the Emacs interface, you can download a new package called Magit. Once you download it, restart Emacs and check the status of the staged/committed files by running M-x magit-status. Here are some of the main commands:
s = Stage (add) the file(s).
c = Commit the file(s)
b = Switch to a different branch.
More info here: https://www.emacswiki.org/emacs/Magit
To play with these shortcuts, I recommend you change the default behavior for GIT’s commit message editing and add Emacs as its default text editor. While committing with Magit, remember to use C-c C-c to leave the current buffer where you edit the commit message.
Here are the commands to make this change:
$ git config --global core.editor "emacs -nw"
$ export GIT_EDITOR="emacs -nw"
* But of course, you can always use the ” git commit -m ‘my message’ ” approach, then the text editor doesn’t matter.
…
TODO lists & org-mode
just sharing some notes on how to use Emacs’ org-mode.
Ignore the paradoxically ludic title. In this article I’m just sharing some notes on how to use Emacs’ org-mode.
In this post we will cover how to:
- Create your TODO list
- Track the progress of your tasks
- Schedule tasks
- Show your agenda
Create your TODO list
Start by playing with a sample todo list. Just add an item with an asterisk (*) and you can hold alt and press ENTER to add a new item under the same column. If you wish promote or demote that item you can hold alt and use the arrow keys to add or remove asterisks (shifting between columns).

Here are some useful commands:
TAB to collapse / expand a single section. SHIFT + TAB to collapse / expand all sections. SHIFT → & SHIFT ← (right and left arrows) to set TODO and DONE marks to the item on that line. M – → & M – ← (alt + right and left arrows) to promote / demote a given item. C-c / filter tree of TODO items (e.g., “t” will only show the items marked as “TODO”). M – x org-sort-entries to organize the list in [alphabetic, numeric, creation-date, etc.] order.
Track the progress of your tasks
Type [ 0 % ] next to the first item at the top of the list and it will be automatically updated as you mark “TODO” items as “DONE”.
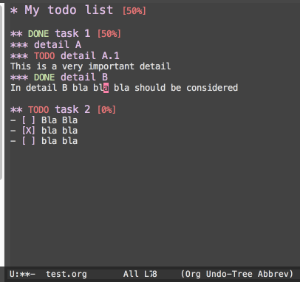
If you create checkboxes with the - [ ] notation, you can tick these checkboxes with C-c C-c.
Schedule tasks
C-c [ adds file to the front of the agenda file list.
C-c C-s schedule

C-c C-d deadline
Show your agenda
M-x org-agenda
( a ) Agenda for the week.
Under ” a ” (All tasks for the current week)
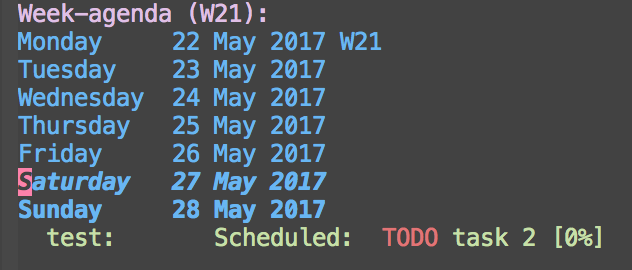
Press ” f ” (forward) to go to the next week.
Press ” b ” (backwards) to go to the previous week.
( t ) all TODOs.
( s ) Search for keywords.
Just a quick cheat sheet here, hope you enjoy!
Bonus tip: The org-jira mode
Installation: M-x list-packages C-s (search for “org-jira”) Press ” i ” (install) to mark the org-jira for installation. Press “x” to execute the installation of the marked packages.
Add the following to your ” ~/.emacs.d/init.el ” file:
(setq jiralib-url “<jira_url>”)

(require ‘org-jira)
Then, once you restart Emacs, you can try:
M-x org-jira-get-issues